Thursday, August 17, 2017

The brush and the saw

Lately I've been struggling with a 12x20'' painting. Never got to the 'now-we're-getting-somewhere' point. In the same period I sold a 6x20'' painting to a buyer who didn't care for the frame, so I had a spare frame. Of the same width. One plus one is two, eh? I digitally cropped the picture of the original painting to a size that would fit the spare frame and I really liked the result. But there is a difference between Photoshop and reality: cmd z. Once the panel has been sawn in two you can't restore it with a simple keyboard command. 

The 12x20" version, before cropping

I slept over it a few nights and then decided I would go for it. I don't have the tools to get the job done, but I live in a town where they have something called a 'stadswerkplaats', a city work shop. It costs next to nothing, they have all the tools and if you're a bit clumsy (like me), they're always willing to help you.

I just got back from the work shop and placed the new painting in the frame and I must say I'm really pleased with the result.

Which goes to show that a painter needs more tools than just a brush.

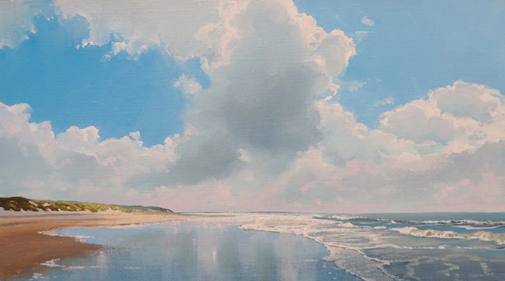
Sun & Mist, oil on panel, 6x20"

Now I have a new problem: what to do with the leftover part...


Thursday, August 3, 2017

the marouflé technique

As some of you may know I often make oil sketches on paper in preparation of larger works on panel.  I sell them for a friendly price on my website. My frame maker produces wonderful passe partoux to protect them during transport. They look great behind glass. 

But every now and then a buyer wants a proper frame instead of a passe partout. In cases like that my frame maker applies the so called marouflĂ© technique. The word 'maroufler' is French and it sounds quite poetic, but it actually means 'to rub'. The painting (or the drawing) is fixed to a solid ground, such as MDF. When it's done properly you can't see the difference with a panel painting. 

Beach with Clouds in Backlight, 9.8x15.7", oil on paper, marouflé

A long time ago I used to do it myself, but to be honest, I'm not a real handy man, so the results often left to be wished for. But if you insist on doing it yourself, this is how it goes:
- The ingredients: acrylic binder, a solid surface (MDF, masonite), a spalter, a credit card, books and a sharp knife
- The paper must be slightly larger than the panel you're going to mount it on. Later on in the process you'll have to cut off the parts that stick out.
- Thin the acrylic binder with water 1:1
- Bring it on with the spalter on both surfaces, the board as well as the back side of the paper. Be sure to have a smooth surface. No humps and bumps. Use the credit card to even out irregularities.
- Now gently put the paper on your board and rub (there it is!) the paper surface from the center to the edges
- Let it dry under pressure (this is where the books come in) for about 24 hours.
- Cut off the parts of the paper that stick out with your sharp hobby knife. And when I say sharp I mean razor sharp. A blunt knif will completely ruin your work.
- Done!

I'd try the frame maker.